I will mention some of the colours used, but this shouldn't be read as holy writ, but rather as my very personal suggestions. Anything even near that (or wildly different, if you have some other ideas) should do. I'm using mostly Vallejo Model Color (VMC), some Vallejo Game Color (VGC), as well as a few Tamiya Acryllic Flat (TXF) and Army Painter Warpaints (APW). Generally, I prefer Vallejo, but many years of painting have left me with a mix of different brands.
Step 0 is to look over the miniatures, remove any extraneous bits such as flashing (a decent knife and a file is very useful here), and, if metal figures, straighten out any bits that have become bent. Both tweezers and fingers can be useful here, but the most important part is patience and steady hands (or you might end up with a second bend next to the first one, instead of removing it all together).

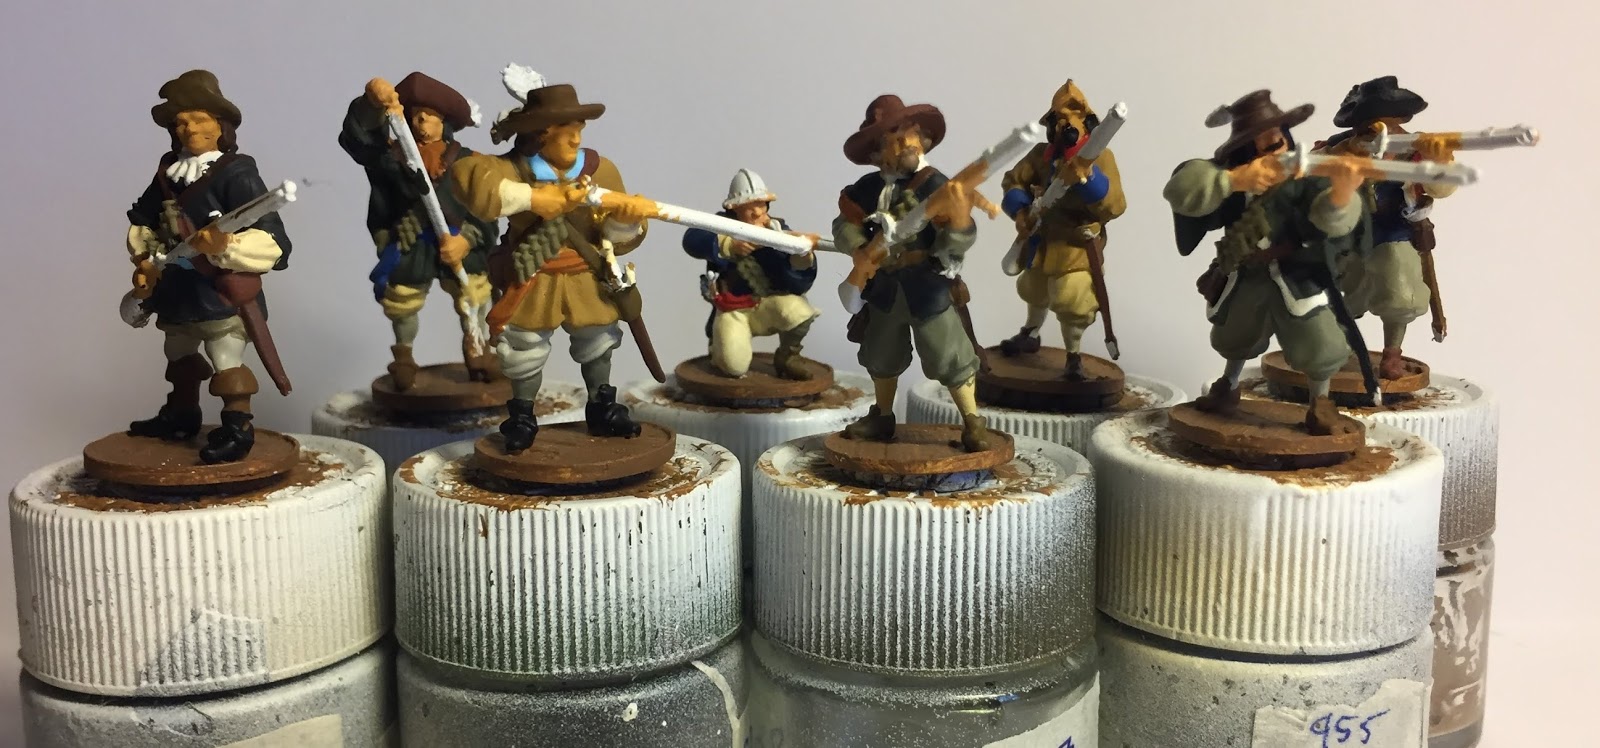
Then, the models are mounted on handles (old Tamiya paint pots and sticky putty is the painters best friends), and primed. I prefer a white primer (Army Painter Matt White) for Blood & Plunder, giving somewhat brighter colors.
The numbers written on the handles are to track the skin colors used, since one shade of "european flesh" can be confusingly close to another. There is also an I to keep track of which unit these 8 belong to (since I tend to paint more than one small unit at a time).

Then, it's time to paint the skin colors (VMC 927 Dark Flesh, 955 Flat Flesh, 86 Medium Fleshtone as well as VGC 036 Bronze Fleshtone, for various shades of "has seen the sun"). The mix of shades means that the models does not look too uniform or cloned, and is even more useful if you have several of the same sculpt.
At the same time, the base is painted. Since Firelock Games have nice bases incorporated into the figures, nothing special is needed. Just give them a nice wooden color (VMC 875 Beige Brown).

The next step is what I call "various shades of linen-ish", where shirts, pants, socks and anything else that I don't have specific intentions for is painted. For this, I tend to mostly use off-white and light brownish shades, with some slightly more colorful for variety. The trick is to have a semi-assembly line style of painting. Pick a color, go over "some" of the models, paint the shirt on one, the pants on another, the socks on a third and so on to give extra randomness. One does not need to use every color on every miniature either, further increasing the variety.
(Using VMC 986 Deck Tan, 837 Pale Sand, 847 Dark Sand, 819 Iraqui Sand, 821 Ger. C. Beige and 886 Green Grey. A certain theme can be seen in the choice of paint colors. Anything sand is usually good if one is out of ideas.)

Of course, the jackets also need to be painted. These can be a bit darker, since they could be both heavier and/or one of the fancier pieces of clothing a militiaman owned. Dark/mustard yellows can be useful (for plain buff coats), as can dark blues, browns or greens... anything dark, really.
(For me, I'm using VMC 862 Black Grey, 888 Olive Grey (really a dark olive green), 824 Ger. Cam. Orange Ochre and TXF-8 Flat Blue.)

The jackets have cuffs, lapels and occasionally shoulder decorations. These should be painted, and is a perfect opportunity to add some more color. Several figures also have sashes and/or a neckpiece, which are another perferct opportunity. I generally grab the somewhat brighter colors for this (in this case VMC 820 Off-white, 957 Flat Red, 962 Flat Blue (which, despite the similar name, is significantly different from the Tamiya paint), 968 Flat Green, 961 Sky Blue and 981 Orange Brown).

One thing that has so far been left unpainted (well, only covered by adjacent colors, which mostly means "flesh") is the hair of the models. Since most of these will have darker hair colors, a somewhat limited palette can be used (VMC 862 Black Grey and 874 USA Tan-earth, VGC 051 Black and APW Oak Brown).
Next up is what I term "leather items", for all that most of them would probably not necessarily be made of leather. Boots, belts, scabbards, hats, and so on. Brown colors are preferred, although I tend to use some black as well (VGC 051 Black, as well as VMC 846 Mahogany Brown, 983 Flat Earth, and 826 German Cam. Medium Brown were used for these, while the bandoleers (and a few other things) were painted VMC 988 Khaki).

After those, it's a three-in-one. First up, any hat decorations/feathers were painted. Since these will be (mostly) Dutch, I opted for a mix between blue, white and orange (specifically VMC 981 Orange Brown, 820 Off-White, and 961 Sky Blue). Then, everything that would be wood (and sword handles) got painted wood (VMC 875 Beige Brown). Finally All the larger metal items (helmets and gun barrels, mostly), got some medium grey (VMC 870 Medium Sea Grey) on them, to simplify the next step.

Said next step would be all the metal bits. First, everything, down to the last button or buckle, was painted steel (VMC 864 Natural Steel). Metallic paints does not always cooperate, but the underlying layer of grey helps it along, hiding any patchy spots. Still, it's always a good idea to look everything over and go for an extra layer where necessary. Then, to add some variety, selected bits, locks, sword pieces, buckles, buttons and what-have-you were painted brass (VMC 801 Brass), since at least some of these would more likely be of brass than anything else.

Then, because I tend to be a bit of a messy painter, it's time to touch up any and all misplaced splotches, especially on any flesh parts (this is the main reason to write down those color choices for skin shades down in the beginning). At the same time, the matches on the matchlock muskets gets painted a suitable "white-ish" color (VMC 986 Deck Tan). And everything is finally painted.

The next step is where the magic happens. Everything is given a coat of brown shade (Citadel Agrax Earthshade, the one GW product I freely admit to using), to bring out contours, add some grime, shade things and generally make it looks nice and unified. If I weren't so lazy, I could probably add highlights after this step, with the original colors, to make them even nicer, but by now, I'm generally looking for the next thing to paint and losing patience.

The base rim is done in my choice of national color (since these will be used almost exclusively by the dutch, they get the orange (VGC 008 Orange Fire over VMC 981 Orange Brown) of the rest of my dutch), and unit markings (in this case, a single stripe of light grey (VMC 884 Stone Grey)). This is the best the models will look, and if I wanted to win prizes, I would show them like this (and add highlights etc).

Finally, because these are metal figures, those have a unfortunate habit of loosing paint when handled roughly, and these are gaming pieces first and foremost, they get varnished. Heavily. First, two layers of gloss or semi-gloss varnish (Army Painter Satin Varnish), for pure protection, followed by one or two layers of matt varnish (Army Painter Anti Shine Matt Varnish) to reduce the shine and give additional protection. Always make sure that the varnish is completely dry before applying the next layer, especially when going from (semi)gloss to matt. I generally allow a drying time of at least 12 hours, often more.

And once the varnish is dry, the figures are finally ready to be demounted from their handles, and can be grouped significantly closer to each other.

Of course, I rarely paint only 8 figures. These 8 had company with another unit of Jewish Milita (8 men strong as well), a Commander, and 4 sailors with weapons upgrades... The line painting method is especially useful when you have as many models to paint as I do, since by the time you've painted any chosen color on the last figure, the first one is as good as dry. Of course, it might also disheartening to have that many semi-painted figures staring back at you. My first advice would be to chose whatever amount feels most comfortable with you (I rarely go as far as 20 models in one go these days, especially if I want a more uniform appearance... these were a kind of exception, certainly helped by their lack of complete uniformity)
Finally, to emphasize once more, this is how I paint my models, not necessarily the one true way of painting your models. But I'd like to imagine that I might have some small tricks that other people can find useful, and to show newer painters that it's not all that difficult to get something surprisingly good-looking, as long as you have (somewhat) steady hands and (a smidgeon of) patience.
/Fool Out