2019-04-08

Blood & Plunder Battle Report - Spanish Militia vs English Buccaneers AT NIGHT

Another game gotten at the club. This time, Spanish Militia againt the ever persistent Barrett's (english) Buccaneers. The dual main goals was to test the Limited Visibility (Night) rules (and Caight Unaware), and to try my newly painted Caballero. Game was at 150 points, as Barrett is slowly paiting up towards 200 (and with a few proxied models, at that). The scenario was Raid, from the original rulebook, with aforesaid Limited Visibility and Caught Unaware rules added.

The Spanish Militia list:
Untested Commader (a first for me)
5 Caballero, with a Grizzled Veteran
6 Hostigadores, with a Grizzled Veteran, and muskets exchanged for carbines and Scout
6 Hostigadores
6 Lanceros
6 Soldados

The idea was to see how well Grizzled Veterans can compensate for the commander not having Inspiring, while also being cheaper. In conclusion,  it might work for smaller points, but I think I need a better commander, possibly AND some Grizzled Veterans (I had constant problems of just too much fatigue)

The English Buccaneers:
Experienced Commander
Local Guide
6 Freebooters
5 Forlorn Hope, upgraded to Veterans, and of course with grenadoes
7 Sea Dogs, upgraded to Veterans
6 English Militia

A force perhaps a bit too focused on attacking, which, as will be shown, would be a minor problem initially.


Rolling of for Attacker/Defender (despite me offering to defend) surprisingly see the Buccaneers as defenders. Presumably, they've plundered a plantation before making camp for the night, and now the defenders of rightful spanish territory see their chance to liberate said plunder, with payment in blood.


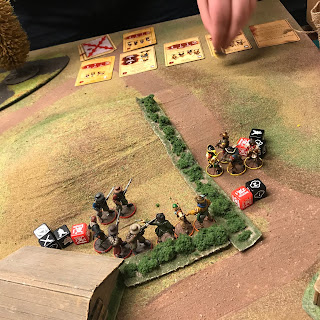
The english deployment, with a few lone militia models serving as guards. The lone spaniard (with a yellow base) is the local guide. Probably a deserter, should be shot if possible.


Hopefully the stars of the show, being ready to ride over the bridge.


And they're off! And sanctified balls, cavalry is fast. They easily move 12 inces in a turn (which is also good, because they're not exactly useful or resilient in a long range fight).


The rest of the spaniards creep closer in the dark, with their matches out to preserve the element of surprise.


Everyone has moved closer, all quiet-like.


And the english dogs suspect nothing (despite some horses going all out on the other side of the house...).


"Wait, I think I see something!"


"Is that horses? I didn't know we had any horses..."


"... oh. Those aren't our horses."

Turn 2 is off with a charge. The Caballero lay into the english Sea Dogs, who have no chance to defend themselves, just as the alarm is about to go off.


Men fall and the English even gets some fatigue (these 2 fatigue might have been the most fatigue the english got in a single turn throughout the game...)


The rest of the spanish rush forward, some lighting their matches as they go (an occasion where I dearly wished I had a more competent commander, since lightning a match is a Dedicated Action, and best done by Command Point).


Then, on turn 3, comes the first event, and every single unit with guns start getting some problems (aside from the Hostigadores, whose matches obviously can't foul up since they're not lit yet).


The Caballero continue their push, felling englishmen as they go. But not quite managing to shake the dogs...


Who then promptly cut back and cut down a cavalryman. That Veteran Upgrade is already starting to pay for itself.


The English Militia then proceed to do their drill, and open fire on the Hostigadores barely visible in the dark.


General concencus is that English Militia is a very good unit to have, because they tend to pay for themselves (and if they don't, they weren't exactly expensive). I should probably try that some. I know that it doesn't work for my spanish militia, though...


The fight between cavalrymen and sea dogs wages on, with more horses down.


And the English discover the eternal problem when fighting spanish, the trees are suddenly full of Lanceros.


Sadly, the Lanceros do not choose to stay in the fight, instead skirmishing away. This allows the Militia to charge in and support the Sea Dogs.


A most spectacular display of skill (or possibly blind, rotten luck), later...


And the cavalry has been killed to a man. And I had even been cheesy and delayed their activation a bit longer, meaning they didn't even get a chance to strike.


The game turns on this moment. Instead of the English getting a Strike Point because only the spanish were withing 3" of the objective (the Sea Dogs barely being too far away), it's the spanish who get a Strike Point for having no units within 3" of an objective (with the Caballero being dead, and the Lanceros getting Shaken by Freebooter fire).


It's time for some desperate pushes. The Soldados charge to try and clear a way to the objective, while Hostigadores screen them (and their Grizzled Veteran instil some fervor in the Lanceros).


The screening Hostigadores (and the commander) are cut down to a man, creating a dangerous hole in the spanish lines.


Meanwhile, the forest is full of fighting, with Soldados and bouncing Lanceros duking it out against Sea Dogs and Militia.


The last Hostigadores charge the Forlorn Hope, in a desperate attempt to tie them up before they get to eath grenades (and maybe, if Lady Luck smiles, cut them down... Lady Luck is a [bleep]ing [bleep]).


There is finally some amount of headway in the forest, the Sea Dogs are cut down, but it takes all the spanish have to do it.


In the end, it is not enough. The ground is covered with dead bodies, and too many of them are spanish. They also didn't manage to hold the objective long enough, and stand (well, most of them lie by now) with 2 strike points too many and no commander to even try to rally the troops.

This game turned on two things. I was too slow to activate the cavalry (worrying that if I managed to kill the Sea Dogs too soon, they would be cut down by gunfire), and just as the cavalry died, my dice luck turned absolutely rotten. I didn't run any intricate statistics, but I think 3/4 of the english casualties was from before that point, because after that, I had trouble rolling a 5+.

Oh, well. Next time, Barrett.

/Fool Out.

2019-03-31

Blood & Plunder Battle Report - French Buccaneers vs Spanish Guarda Costa

Another week, another battle at the local club. This time, we got out the big(ish) ships for a 250 point naval battle.


In the yellow corner (me), we have the Spanish.

Guarda Costa, with an Experienced Commander
7 + 10 Marineros, without pistols, but each with a Master Gunner
5 + 6 Milicianos, upgraded to Trained
6 Marineros Piqueros
All on a Light Frigate, with 2 Light and 4 Medium Cannons on each broadside, as well as 2 Light Cannon Chasers

In the foppy corner, the French

French Royal Navy, with an Experienced Commander
3 units of Marins
3 units of Infanterie
(I don't remember the exact sizes of each)
On a Light Frigate, with 6 Light Cannons on each broadside


We played the "Control the Field" scenario from the original rulebook, or "Control the Wind", as the case may be in the naval case. Roll-off decides that the Spanish are the attacker, and will thus start upwind from the french.


The spanish, eager for french blood, get of the first salvo, which do some damage to the french, but not even close to enough.


The french counter by going straight up into the wind, just managing to avoid a raking shot. They're also firing with everything that can bear which is mostly the Infanterie) onto the spanish rear deck, reducing the sailors positioned there.


The spanish counter by also turning across the wind, hoping to bring the loaded guns on the other side of the ship to bear. Careful timing manages to avoid a rake, and also some counterfire by the stern chasers. Once again, though, while some damage is caused on the ship, not nearly enough frenchmen fall.


And then disaster strikes, the spanish sailors are not quite up to scratch, and the sails suddenly have no wind (that is, I falied a Sailor roll to tack). The frigate is drifting towards the frenchmen, who waste no time in getting closer and preparing the grapples.


With the spanish drifting, the french finally manages to set up a rake, wiping out the sternmost Milicianos and causing a leak.


Things are not looking good for the spanish, as the french unload deck after deck of cannonfire into her (just barely avoiding any more rakes). Meanwhile, the cannon crew for the middle deck has to abandon their guns to rush back and do something about that leak. Which proceeds to worsen and spread to the middle deck as well. At leas there is some hope that it can be dealt with, if we get a turn. The only good part, is that the initial eagerly thrown grapples miss.


Mary be praised, we finally have wind in our sails. But Lucifer be damned, it is not enough to get away from the french.


This time, the grapples do not miss, and french soldiers storm aboard, met by the brave spanish captain.


The battle for the rear deck will waiver. Reinforcements from the Piqueros (abandoning their own guns on the foredeck) almost drive back the first french unit, but they're in turn reinforced by another one.


And as the captain and his loyal sailors have finally had enough, and fall back (trusting the Piqueros to hold the line), they're cut down by french sailors jumping over from their foredeck.


With most of the crew dead (including the Milicianos on the middle deck, which I honestly don't remember how they met their end), 2/3 decks of the ship leaking, and the captain dead, the few remaining spanish have no choice but to strike their colours. 4 Strike Points against 0...


At least the french won't get a fresh ship without some major repairs...

A fun battle, that was decided by one failed Sailor check. Had that one succeeded, the french would have eaten another fat broadside and hopefully been in much worse condition to try and close in. For next time, I will try to save a Fortune Point of inopportune siling mishaps (and perhaps get Expert Sailors, or some other way to avoid such a misfortune). And I'll make sure to have some kind of defensive fire ready, in case I am boarded.

Or I might ust go with full grapeshot, clear the deck and board.

/Fool Out.

2019-03-09

Blood & Plunder Battle Report - Ostenders vs Buccaneers

Time for more Blood & Plunder action down at the club. This time, I'm fielding Ostend Privateers (technically Spanish, ut with significant Dutch representation, for a nice, flemish feel), up against the English Buccaneers who are swiftly becoming my most regular opponent (which is absolutely not a bad thing).

The scenario was a mix between Rescue and Escort, with the English Buccaneers having to guide a beautiful spanish senorita (kidnapped or "kidnapped", in either case she used the stats of a Captured Merchant) over the table, while the spanish privateers had to rescue her.


The initial deployment. The English have to get all the way over there, though not quite to the corner (since we had a 4'x4' battle field).


English deployment, with Forlorn Hope and Commander on the dominating hill, militia behind it, one unit of freebooters guiding the senorita, and the last one acting as advance guard

The English list:
Untested Commander
7 Forlorn Hope
2 x 5 Veteran Freebooters
7 English Militia


Most of the Ostenders deployed in a very cramped square, with the melee-centric units up front, and musketeers behind


Oh, and one sneaky unit of corsarios heading around the other way.

The "spanish" list:
Untested Commander
6 Zeelieden
6 Kapers
2 x 6 Corsarios
6 Marineros Piqueros

Both lists dialed in at exactly 150 points.


The first thing that happens, the Forlorn Hope charge off their hill and into cover behind the nearest shrubbery. And then they push for an extra action and release a volley of musketballs, shot and the mandatory grenade onto the Piqueros Marineros


Which result in two men going down before they know what's going on. Not an auspicious start, especially since there were only two hits.


The Piqueros are understandably miffed at this, and decide to countercharge, through the hedges for some cover.


Only for three of the four to be gunned down by swiftly drawn pistols, and the fourth one deciding that enough is enough and buggering off (with, I think 3 or 4 fatigue). Lets try that again. Zeelieden, charge!


Went much better, it helped that the Forlorn Hope now had two fatigue and thus couldn't do a defensive fire. Now they're tied up with Hard Charging(!), Ruthless(!!) sailors. I'm honestly amazed that only two died.


The rest of turn 1 consisted of maneuvering and long range volleys that achieved little. The Kapers beging to circle around their hill, to hopefully intercept the kidnappers (or "kidnappers") before they get away.


In the beginning of turn 2, the outflanking Corsarios turn up, trying to compensate for the suddenly disappeared Piqueros.


And I then proceed to draw not one, but two Event Cards.


Thankfully, I get away with the surprise and slightly sunnier weather. Could have been much worse.


First up, the Zeelieden proceed to draw their pistols and go to town on the Forlorn Hope in their close combat. Only two survive the fusilade of pistolshot, swords and axes, and proceed to run away in a most satisfying and permanent manner.


The rest of the english can only look on, mildly horrified, before trying to gun down the now very unprotected Zeelieden.


Said Zeelieden manage to get into cover before too many fall (only half of them...), and most of the rest of turn 2 is spent maneuvering...


With two exceptions. The newly arrived Corsarios goes on to prove that "elite" or not, spaniards shouldn't be trusted to hit the broad side of a barn (they fire and a unit of Veteran Freebooters, and of course miss with every shot).


And some too ballsy maneuvering on my part then accidentally sets up a golden opportunity. The Veteran Freebooters can mount their bayonets and charge around the corner, straight into my Corsarios (and Commander) before they can react. This is going to be painful.


It was painful, the corsarios take significant casualties, are shaken and fall back. The freebooters hold back and prepare to charge again. The corsarios barely have time to rally (thank you, 13 of spades, beating the 12 of spades of the english) before they're set on again. And this time, the Zeelieden are pulled in as well.


Of course, Zeelieden cares not one bit, and stand steady as rocks while the corsairs run away shaken. Again.


The Zeelieden the proceed to push back, making the Freebooters shaken in turn (despite they themselves being on 2 fatigue and not quite as spry as they seem).

As the last action in turn 3, the escorting freebooters push forward with their senorita, to get close to the middle point of the table and avoid a strike point. With the casualties the english are taking, and with their commander gone, strike points are becoming somewhat of a problem. But they succeed (so far).


And turn 4, it's my opponent who draws two event cards (first one, and then the replacement card is also an event)... which mostly just resets the weather. All in all, we had 4 events in this one game. I doubt it's possible to get more.


The Kapers see a golden opportunity, and rushes forward to charge the escorts 10" away (I am now bemoaning the fact that they pushed last turn to reload... spoiler: they will not get to fire their guns again this game). They're in a tenuous situation, but will hopefully be able to delay the escort for a vital turn, or perhaps I'll even manage to give them some reinforcement.


Most units who are able (the english militia, and the outflanking spanish corsarios) now rushes for the sudden, and pivotal, combat in the center of the table.


The final turn of the game. The Corsarios Command unit finally stops running around in circles and waving their hands over their heads, and advances towards the action again (much good that will do them...)


Meanwhile, the Zeelieden finish of those pesky Veteran Freebooters. Let's see how much use your pointy stick is now! Hah!


And in the center, where everything is set to be decided, a furious melee results in the escorting Veteran Freebooters being cut down to the last man by both Kapers and Corsarios, the beautiful senorita being rescued by some noble and handsome spaniards, while the English Militia is too late, and can only extract vengeance on the poor defenseless Kapers (who have two fatigue, and thus can't shoot back).

End result: the English have "way too many" Strike Points, the senorita has been rescued, and they are soundly trounced. Victory is mine.

With some hindsight, I will have to note that the two most impressive units have to be the cheapest ones. My Zeelieden held that flank quite well, wiping out two entire english units with only some command points for help. Meanwhile, the english militia did surprisingly well, being a constant thorn in the side that couldn't quite be ignored.

None of my other units behaved as expected. The Piqueros died doing almost nothing (although that one fatigue they caused the Forlorn Hope is what allowed the Zeelieden to charge home), instead of being the melee beasts I expected (they have Lancero stats, if not Lancero special rules). Meanwhile, my long range musketry (the Kapers) won me the game by charging, and my short range musketry/elite fighters (the Corsarios) played marksmen (and missed), ran around being fatigued and only barely managed to contribute (with that final charge-and-rescue)... Lesson to be learned: I think I need more Ruthless Zeelieden (or possibly try something similar with French Marins for L'Ollonais (to get that Ruthless).

The English had one major problem in that they lacked a suitable escort unit. The escort has to push forward, leaving little time for musketry. The Veteran Freebooters used were thus conflicted, and couldn't provide their full worth. Meanwhile, the Forlorn Hope would have invited being too ballsy, probably been isolated, and defeated in detail, and the English Militia wouldn't have been fast enough since they were only Inexperienced.

Since I'm planning on running a similar scenario during Easter, as an introduction to Blood & Plunder (always good to get new players, and Swedens largest gaming convention is here and then), I will have to do further poking, prodding, and balancing. Possibly reducing the distance that need to be covered, and making sure that any defending list has a suitable escort unit...

/Fool Out.

2019-02-07

Blood & Plunder Battle Report - Natives vs Buccaneers

Time for an after-action report from my latest battle (alternative spoilery title: why you shouldn't bring a bow to a gunfight). Pictures are somewhat spotty because, as usual, I got distracted by trying to win (or at least eke out some consolation) and forgot to take pictures

I fielded my natives, using the Caribbean Tribes list:

Experienced Commander
6 Warrior Archers with Poisoned Arrows
2 x 4 Young Warriors
4 Warrior Musketeers with a Sharpshooter

Against them was English Buccaneers:

Experienced Commander
7 Freebooters
4 Forlorn Hope
5 English Militia

The scenario is Search and Recover, wiht 6 tokens spread evenly over the table.


Turn 1, most things move up, with some tendency to form lines.


The english battleline is standing steady


The natives are not so steady, especially after the Musketeers move a bit too close and wind up so that the Freebooters can move to within 12" and shoot. Only a single hit, but the save is failed, as is two of the three resolve tests (grumbling about The Sound of Thunder can begin now).


The english militia, so far a long way from any fighting.


Turn 2, Forlorn Hope moves up and fires as the Young Warriors. Two saves are failed, fortune rerolls and the dice come up 1, 2, 2... I manage to succeed at three out of five resolve tests, but two fatigue is enough for the last youngling to bugger off (more grumling about The Sound of Thunder).


The Musketeers are rallied by the chief, only to then be reduced to a single man with two fatigue in a similar way to the Youn Warriors. In Turn 3, the Warrior Archers and the Chief scamper off sideways, to hopefully not be as exposed to gunfire, and try to get some strike points back, because the natives are now up to two strike points, with only a few english having fallen to arrows.


The best option to get at the english is the militia, which are currently standing unloaded after some not too effective fire against the other unit of Young Warriors. They will soon get reduced by Warrior Archers charging through the forest, getting a valuable strike point back.


The english line turns, and the Freebooters gets a charge off against the Warrior Archers, who are only saved by Evade (and then promptly charge back in at the Militia, wiping them). Meanwhile, Young Warriors, after suffering two casualties from the Forlorn Hope, do a death-defying charge into them... only to be wiped out. The natives are now back at two strike points more than the english, and finally their resolve fails. The survivors scarper off, hoping for revenge another day.

In the end, the objectives didn't matter, the natives looked at two of them (neither of which was the wanted one), while the english ignored them in favor of charging forward and killing stuff.

All in all, two lessons can be learned here. 1, I shouldn't roll dice (failing 6 out of 7 saves and way too many resolve tests in the first two turns was... harsh.) and 2, we need more line of sight-blocking terrain. Ideally houses, but until then, we'll have to make do with hills and rocky outcrops.


/Fool Out