2019-09-19

Blood & Plunder Battle Report - Brethren of the Coast vs Logwood Cutters

Ahoy me hearties! Shiver me timbers an' gather round me, ye corsairs an buccaneers...

Ah, enough of that. But since it's Talk Like a Pirate Day (good as any excuse), I got in another game of Blood & Plunder, and an unusually piratical one at that. We couldn't make it a naval game (the dangers of mid-week gaming), but at least it's 200 points.

In the black corner, we have Georges L'Hachets Logwood Cutters:

Experienced French Buccaneer Commander (with Buccaneer Gun) (Georges himself)
4 Engagés
4 Engagés
6 Flibustiers, upgraded to Veterans
5 Freebooters
5 Boucaniers
5 Veteran Freebooters
 

Providing a varied force, with both long range and close range firepower. They ended up on the (nominal) defensive, but that seems to only have made them angrier. Aside from one unit of Engagés, who forgot to load their guns, and the Boucaniers (who didn't particularly care either way), all units got "Determination" from the Logwood Cutters special rules, and so got a free action on the first turn.


In the other black corner, we have the Brethren of the Coast, supposedly led by Francois de Bernaise

Untested French Buccaneer Commander (with Buccaneer Gun)
7 Flibustiers (with an Officer)
7 Marins (with a Reformado)
7 Marineros (with a Son of Neptune)
6 Freebooters
8 Enter Ploeg (with Blunderbusses, Stinkpots, and a Grizzled Veteran.


I am somewhat proud over the fact that this list contains units from all four of the major nations, although I kind of wish that I had managed to also add natives and generic Europeans. Alas, that would have prevented the other sort of silliness I wanted to test...

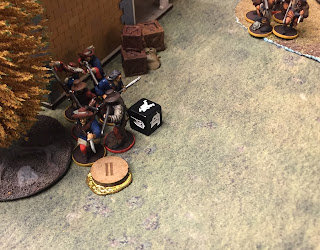
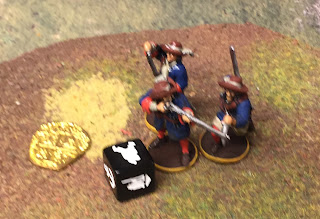
The idea here is that various extra characters compensate for a poor (but free) commander, while also allowing for some command point shenanigans. If you're doing something like this, remember to keep track of which units have gotten a command point this turn. Since we weren't at sea, I used the Anchor symbol on the marker dice for this purpose.


The scenario is Search and Recover. Fitting, on this day: find the booty. Six potential markers for booty (should be eight, but we were numpties and couldn't deploy the last two), with the treasure under number II.


Francois Brethren form a semi-orderly line. Flibustiers and Enter Ploeg aiming for the right flank, Freebooters (with Francois himself in command) and Marins up the center, and Marineros on the left flank.


The logwood cutters have Engagés and Freebooters (with Georges) on the left, Veteran Freebooters on the right, and Flibustiers and Boucaniers in the middle).


Everything ready to rumble (aside from the unprepared Engagés).


The first sign of action is the Enter Ploeg from the Brethren, helped by a command point from the Officer, checking out their treasure mark. Sadly, it's a dud.


Brethren Freebooters and Marins do something similar, finding another dud. There are now low chances of the treasure being on the Brethren side of the table.


Turn 1 sees very little action. The Brethren advance up, roughly on a line.


The Logwood cutters have done something similar. The french contingent is holding behind cover in the middle.


The Veteran Freebooters do something similar on their flank, looking angrily at the approaching Marineros.


And on the left flank, Georges Freebooters are ready to look at their marker, with some support of the Engagés.


But it is another dud! Where is that booty?! The Freebooters elect to then hide behind the nearby house, and move towards the last markers since this part of the table is cleared. Engagés stay to delay the enemy.


The Brethren Flibustiers see the sneaking Engagés and decide to do something about that. One falls to their bullets.


The return fire is less successful, mostly only hitting trees.


But Georges Flibustiers have managed to sneak up and uncover another marker. And it's the price! Phase two is now a go, defend/capture it!


The Brethren Enter Ploeg decide that a good first step for that, is to clear out this side of the table by rushing forward and firing wildly. Two blunderbusses and six pistols tend to not leave many men standing afterwards... (that is 5 hits against a unit of 3, for those keeping track).


The other unit of Engagés turn up, and try to do something about the band of angry Dutchmen coming in their general direction. Which results in one spent fortune point (for Georges) and a blown-off hat (for the Enter Ploeg who made his save).


Francois Freebooters then swiftly run up the hill, and open fire on the dastardly french who have their gold... to no effect.


Meanwhile, the Veteran Freebooters, realizing their strong language seems to have no effect, elect to fire on the approaching Marineros... also to no effect, and that after spening a fortune point.

Turn 3 opens pretty much the same way turn 2 ended, except competently.


Francois Freebooters fire on Georges Flibustiers again (got to love the combination of free reload, command point reload, and action fire on a spade), and this time, hit and actually fell three of them.


The Veteran Freebooters, meanwhile, do something similar and kill two Marineros. Which just seems to have made their friends angrier.


More fire pours into Francois and his Freebooters on the hill, and men start to fall.


The Marineros, moderately pissed of, runs forward and discharge their pistols into the Veteran Freebooters, actually managing to kill one (and adding a vital Fatigue).


Then the Marins, having rushed sideways from their treasure hunt behind the hill, follows up. And the Marins are led by a Reformado. Who have a command point which can be used to order a unit to charge...


The Marineros goes in, dodging defensive fire, cut down two Veteran Freebooters, and makes them Shaken. Their threat ends now (or soon, at least).


Georges Freebooters move into the forest, and also fire onto his opponent. More men die, and things are beginning to look dire.

On the other flank, it is mostly movement as both sides tries to figure out how the break the other.


Turn 4 begins with even more fire poured into Francois on his hill, and the last of his compatriots finally fall. Only for Francois to Cheat Death (because one fortune point was saved specifically for this when things started to look dire) into the now nearby Enter Ploeg.


Deciding that it is better to not even give them a chance to react, the Marineros finish of the Veteran Freebooters. However, they are left far out on left field, and will not take any more part of this fight, but just rushing towards the sound of guns (and eating up the less useful cards).


Some skillfull use of high-action cards and command points allow the Brethren Flibustiers to rush forward, with Francois Enter Ploeg not far behind (both had 3 actions, and spent their command point from Francois/the Officer on the other unit). The Flibustiers pour fire into Georges Freebooters, but only one man fall.


And then some sneaky Engagés suddenly appear behind the Flibustiers (I might have sort of forgotten that they were there...), and one man falls in the open street.


The Brethren Sailors move towards the large house, but only the Marins manage to enter it.


The Logwood (french) forest, however, looks like a hard nut to crack.


The Flibustier swiftly regret their hasty action, become shaken, try to flee, and are cut down by gunfire from the forest, in roughly that order.


The turn ends with Francois and his Enter Ploeg carefully advancing to the corner of the building before throwing down a smoke screen for some desperately needed cover (leaving a small stretch of empty ground to be able to charge next turn.


Turn 6. Last turn. It's do or die.


The Marins charge out from their building, straight for Geroges and the currently unloaded Freebooters.


One man falls on the way in (cue angry frenchmen), but in revenge, all but one Freebooter is cut down, and Georges are among the dead.


Logwood Flibustiers fire some towards the Enter Ploeg, felling one man (cue angry dutch) and then fall back with their treasure.


Francois and his Enter Ploeg find their aim slightly off and charge the Boucaniers instead (the Flibustiers falling back meant that they could no longer be reached). Pistols blazed and frenchmen fell, and in the end, not a single Boucanier was left standing.


And as a final farewell, the last of Georges Freebooters was cut down by a command point. The Brethren stand with one Strike Point from casualties, and a second for the Logwood Cutters holding the price at the end of turn 3. The Logwood Cutters, meanwhile, had three Strike Points from their casualties, and was perilously close to a fourth with only 7 models left on the field in the end.


Technically, and rules as written, it was a victory to the Brethren (although I find it strange that the prize only gives out a Strike Point in turn 3...). But the Logwood Cutters managed to get away with the price, and so got the moral victory. And they didn't even have to share the price among too many men (they just need to find a replacement for Georgos, because even if he would have survived the melee, he was probably bound for some hard questioning).

Lessons learnt:
  • Engagés keep being surprisingly good. They're cheap enough that anything they actually manage to do is a welcome surprise, and yet they're good enough that they can't quite be ignored.
  • The Brethren might have had a tad too many Command Points. Still, the combination of Officer and a Commander allowed for several fun moments and unexpected speed, potentially allowing both units to move 8" on their own activation, and pushing the other unit 4", for a total of 12" each. And the Reformado made good use of his "Charge" Command Point twice. Only the Son of Neptune and the Grizzled Veteran didn't manage to provide anything, but that was mostly because they never took any fatigue/never got hit in close combat.
  • Terrain setup is still tricky, and once the Logwood Cutters managed to fall back to their forest, things got hairy for a bit (although more aggressive use of Enter Ploeg and their Stinkpots might have solved it earlier).
  • Enter Ploeg keep being amazing. I just need to find the time (and actions) to reload their blunderbusses some time... and probably learn to use them better since, with hindsight, that might have solved the problem of the french forest for me.
  • I probably need a studio, allowing me to write battle reports as the battle is happening (and thereby discovering if I'm missing images of some important part of the action...)
Fair skies and following winds, buccaneers.

/Fool Out

2019-09-05

Chain of Command - 15mm Panzergrenadier Platoon

Time for something different, both smaller and more modern than my usual stuff. Finally finished a platoon for Chain of Command for myself. And it only took a year, too...

For theme, I elected to go with a platoon from the 21st Panzer Division in Normandy, because they have some fascinating vehicles and because I enjoy reading Panzer Commander (by Hans von Luck, who would be in command of the 125 Panzergrenadier regiment of the 21 Panzer during Normandy).


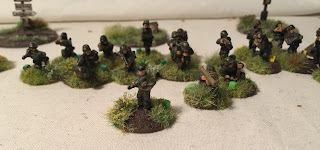
The main platoon, with HQ group and 3 squads, as well as Patrol Markers (with several village names from around Caen, some of them well known).


Each squad consists of a junior leader and two teams with 4 and 5 men each, as well as 2 MG42s (and an extra man for carrying the squad allocated panzerfausts, he can be replaced by an ordinary rifleman once those are used up).


And of course the platoon HQ, with the Lieutenant (more often a senior sergeant at this time of the war...) and two men with a Panzerschreck (do not apply armour to a panzergrenadier platoon, they have plenty of counters...)


For support, there is a fourth squad of Panzergrenadiers from another platoon, but otherwise similar to the in-platoon squads (except they don't count as platoon casualties in campaigns, gamey but might be necessary... and more men on the ground is always useful).


There is of course also a second senior leader (either this platoon were lucky and had two men competent enough, or there's some support from the company... or it's two understrength platoons working together, the justifications are endless). In any case, provides some welcome extra command and control of the battle.


Thematically, it feels wrong to not have a heavy machine gun available. Might not always be the most necessary (not when you have 6-8 LMGs available), but eh.


When you need some heavier firepower, you call in the regimental mortars (or any of the other artillery available). And hope you have a spotter who can actually call them in.

 
And, in case on Panzerschreck team wasn't enough, here's a second. Because screw tanks.


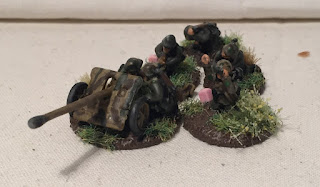
And in case you want something with more range, there's also a 5cm PaK38. Its small size would make it easy to hide, and while it might not have enough punch to take out enemy tanks from the front, lighter armour will do best to stay away.


What's better for getting around than a car? Two cars! (One Kubelwagen, and one heavier Steyr, but gamewise the same).


... or there is the Sd.Kfz.250/9, a halftrack converted for recce purposes. A 2cm autocannon generally hits the right point between cheap and lethal when the main fight is infantry vs infantry. And being (nominally) armored itself isn't a bad thing.


For your heavier anti-tank needs, there is always the mobile bush... I mean the S307(f) PaK40. More mobile than towed anti-tank guns, and at least somewhat armoured. The bad point is that it is taller and harder to hide, but hopefully liberal application of bushes should help there.


Last I checked, there were no rules for this vehicle in Chain of Command. I could of course stat it up, but for quick play and ease of use, I will probably run it as a counts-as Marder.


Finally, there's a Panzer IV, because how can you have germans without the workhorse of the Panzer arm?


With some extra bushes for protection and hiding from the ever-present allied air forces. Not as much as some other vehicles (*cough*S307(f)PaK40*cough*), since it has to be mobile (or prepared to be mobile), but hopefully enough.


"Please think I'm a bush, please thing I'm a bush..."


All in all, a decent force with plenty of options. Doesn't make it worse that Panzergrenadiers are generally considered the strongest platoon for their force rating in Chain of Command, borderline broken if you ask some... time to get some games in and figure out how to use them (and maybe how to counter them). Just need to get a Lorraine Schlepper or two for maximum HE power too.

Bases were washers, 15mm for ordinary soldiers, 20mm for leaders and MG teams (the latter with gunner and loader on the same base), 25mm for the larger guns. Squads and teams are denoted by "pixel pearls", with one color being unique for each of the larger squads (giving Green, Yellow, Orange and Blue squad), another color for HQ (Light Green) and smaller support choices occasionally sharing (pink for anti-tank choices, red for primarily anti-infantry).


Oh, and I accidentally painted a pair of bunkers at the same time... I have no idea what to use these for, but since I had them, might as well paint them, I guess.

/Fool Out

2019-08-04

Blood & Plunder Battle Report - Flibustier Nau vs Black Caribs

It's been quiet for too long. Quick, grab my Jolly Roger and bring me that horizon...

I got another game of Blood & Plunder in, and hopefully, I can tell its story (it was a bit hot when we played, so memory might be faulty and overheated, as can the pictures). But it was a 200 point game, first one in a bit too long for me.

I wasn't fully prepared, but wanted to try out something fancier than the usual Experienced (or Untested) Commander. And I wanted to try out the frenchmen, because I haven't used them in too long. So what would be fancier than Francois L'Olonnais (he of the many mispronounciations)? (well, maybe Laurens de Graff, but I haven't painted him yet, and there were one other thing I wanted to try out...)

End result:
Flibustier Nau
L'Olonnais (also known as Hollandaise)
6 Flibustier
7 Flibustier
(the main fighting force, being good at pretty much everything... if they survive)
4 Engagés
4 Engagés
(and some cheap support for the Flibustiers)
11 Marins with
 - 3 Blunderbusses,
 - Grenadoes
 - a Grizzled Veteran
(these are interresting. A Fight Skill of 5, Hard Chargers, Ruthless, and enough Firepower to put some fatigue on whatever they're charging first, if they have enough actions... means 11 angry sailors hitting on 3+)

Up against me were some Black Caribs (all converted from various plastic kits)

Seasoned Southern Tribes Commander
4 African Warriors with bows
4 African Warriors with bows (these two will be referred to as the bowmen)
8 African Warriors with Pistols (pistoleers)
8 African Warriors with Muskets (musketeers, accompanied by the commander to remove Slow Reload)
6 Native Warriors
 - Veterans
 - Throwing Weapons

Scenario was Rescue, with the Black Caribs defending ("they've captured some poor merchant and are going to do unspeakable things to him. We must stop them, he's ours to do unspeakable things to")


A nice village in the middle, with Africans (and natives) spread out in it, most of them in the biggest house.


In total, the big house had 4 out of 5 units, with the musketeers (and commander, and merchant) on the balcony, archers in the upstairs room, Native Warriors downstairs and pistoleers in the covered entrance.


The last unit of bowmen were up on the roof of another building nearby, having an excellent view of the area.


The frenchmen were split (to prevent the Caribs from just running away), with some Flibustiers and their servant Engagés coming in from the "north"...


 And the other unit of Flibustiers, with L'Ollonais, their servants and the horde of angry sailors coming in from the south.


The southern Engagés gets the honour of opening the firing, with a salvo into the bowmen in the big house... and 3 out of 4 hits. They're even within 12", so they get Ball & Shot on those, although the shot fails to do any more hits.


Then the Flibustiers follow up, and eager to not be overdone by their servants, get another 3 hits (and more chances for Ball & Shot).


Suffice to say, that unit of bowmen weren't a problem any more after that salvo.

The Black Caribs spent most of turn one getting rid of the Fatigue generated by L'Ollonais "Terror" special rule. And then, on turn two...


Thirsting for vengeance, the pistoleers charge through the house and into the Flibustiers with the hated L'Ollondaise.


Their pistols firing, there isn't much left of the Flibustiers afterwards. But H'Ollondaise isn't that easy to kill, he jumps over to the Marins with a Fortune Point...


And then leads them into a countercharge where everything goes of as intended. Blunderbusses and pistols leave the pistoleers on 2 fatigue (and somewhat fewer than before), and the the sledgehammer of 12 attacks hitting on 3+ arrive.


The end result is a red smear among the crops.


The rest of the turn is spent maneuvering. The Black Carib Musketeers move down as the Native Warriors move out to deal with the northern flank.


The northern Flibustiers countermove to deal with the Warriors.


And the northern Engagés move in to start a longrange firefight with the bowmen who have harried their southern brethren (essentially preventing that unit from ever doing anything useful again by making them shaken every now and then).

And then it was Turn 3.


The northern Flibustiers do what they do best, going in close and blasting things away with Ball & Shot. Only two Native Warriors are left. But these swiftly rally, and tries to get vengeance...


... Only to be shot down by the pistols of the (thought to be unloaded) Flibustiers... oops?


The Black Carib Musketeers goes the other way, and charge into the (actually unloaded) northern Engagés. Amazingly enough, they manage to stay alive and not too badly shaken.

Turn 4!


Doing a swift about turn, the northern Flibustiers rushes to their servants' aid (as do the Marin sledgehammer, but they're just a bit too far away).


Getting pounded from two directions by angry frenchmen that seem just a bit to insistent, the Black Caribs run away, and then finally fails a Strike Test.

Victory for the Hollandaise and his angry frenchmen, with surprisingly few casualties.

A few things I took away from this game:

-The Black Caribs, while potentially nasty, can get beaten, and quite well at that. Still, the list seem to work, which is good (since I designed it in large parts for my friend).

-L'Ollonais is fun with all his many special rules (and I even forgot one of them, should have had a fourth Fortune Point... that I never would have needed).

-As are Ruthless Marins with blunderbusses. They worked exactly as expected, I will have to paint up some of these "for real", instead of using dutchmen and a few copies of "Comment Parler Français".

-Engagés were surprisingly good for their points, almost like the English Militia I have had the "joy" to encounter a few times. Cheap enough to not care too much about (and wasting resources on killing them is almost always non-optimal), but annoying enough that they can't quite be ignored. I will have to paint a few of these as well, although dutchmen can serve for now.

-Ball & Shot is an actually useful rule, and not just something fluffy and nice to read. I think I rolled more 10s at short range this game than all my other games combined...

-French Buccaneers (and offshoots like Flibustier Nau) are fun to play, I need to do it more often. Perhaps time to give the Dutch a break.

/Fool Out.